Ok, I’ve decided to put together things that I’ve been studying for the best part of a year and build my own lab topology using VIRL. The unfortunate thing with VIRL is that I’m now limited to a 20 node topology, but I’ll make due with what I can for now and if needed, I may move to GNS3 for a larger topology in the future. Honestly, I don’t know why the 30 node option was removed, except that Cisco has now partnered with Packet to offer double the nodes of your license, but you have to purchase server time on their platform, which honestly seems shady and really has me considering something different in the future if things don’t change. But that’s beside the point of this first post, so moving forward.
Anyway, here is a picture of the lab that I’ve put together in VIRL, and I’ll be attaching a link if you’d like to the VIRL file at some point if anyone wants to download it and play around with it on their own.

This is just the basic flow for now, and I have a feeling that it will be changing over time as I decide to test out different things.
MPLS Core, Step 1: IGP reachability
To begin with, I’m focusing on the configuration of the MPLS core of this, since it will be needed for communication between the sites. 
The core I’ve put together consists of 4 PE routers, along with 2 P routers. The IGP for the core is just a simple OSPF area 0. The first thing to do after everything is IP’d is to turn up OSPF on the six routers. I went with an OSPF PID of 1, and set the router-id for each router to 0.0.0.X, where X was the number of the router (0.0.0.1 for P-1, 0.0.0.10 for PE-10, etc). Network statements were in place for the point-to-point interfaces and loopback0 addresses. I used /32s for the loopback0 address since I was going to be using that as my MPLS LDP router-id as well.
Sample OSPF config for PE-10:

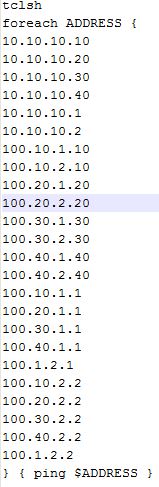
After OSPF is turned up, I ran a TCL script on each router to ensure that I could reach all points within the core from each router. Here’s the TCL script I use, it’s pretty good to get in this habit as I prepare for the lab, although the first run seemed to cause several of my lab routers to lock up and need to be rebooted. I think I had an incorrect statement in the script that I corrected, but it was definitely a reminder to save often.
At this point, we have reachability between the different routers in the network from the other routers. This is the first step that I take when I am setting up an MPLS core, as we need to be able to reach the other devices via Layer 3, because MPLS uses our routing table and CEF to build its LFIB (label forwarding information base). We will look at this in the following sections though.
MPLS Core, step 2: Enable MPLS
Once we have established L3 reachability within the core, we can focus on turning up MPLS on the necessary links in order to exchange LDP information and build a LSP across the core.
The first step is to run the global configuration command mpls label protocol ldp on all routers in the core. This isn’t a necessary step, since on most routers, LDP is the default protocol for MPLS, but I do it out of habit when I’m enabling MPLS, plus, you never know when it’ll come in handy in a troubleshooting lab if TDP is enabled instead of LDP, or if LDP is disabled. The next step that I like to do, but is not necessary, is to define a label range that is specific to the router. This makes reading the LFIB much easier, as you can see which labels are applied by which routers if they are using a specific range for each router. This is done using the global command mpls label range <min-value> <max-value>, with a label range of 16-1048575. Labels 0-15 are a reserved label range:
- 0 – IPv4 Explicit NULL Label – RFC 3032
- 1 – Router Alert Label – RFC 3032
- 2 – IPv6 Explicit NULL Label – RFC 3032
- 3 – Implicit NULL Label – RFC 3032
- 4-6 – Unassigned
- 7 – Entropy Label Indicator (ELI) – RFC 6790
- 8 – 12 – Unassigned
- 13 – GAL Label – RFC 5586
- 14 – OAM Alert Label – RFC 3429
- 15 – Extension Label – RFC 7274
The last global command to run is another one that is not necessary, but I typically run it in order to have control over the router-id used for MPLS, as this needs to be a stable and reachable address in order for LDP to remain stable. The command mpls ldp router-id <interface> force will force MPLS to use the IP address of the interface specified in the command. Since I configured my Loopback0 interfaces with a /32 for this reason, I use the mpls ldp router-id loop0 force command to use this as my MPLS LDP router-id.
The reason that I use an address for the router-id is that when MPLS forwarding table is created, it associates a label with both the IP address and the subnet mask in order to create the entry. If these are not consistent across the label switched path (LSP), then the packet will not be able to reach its destination. Using a /32 and making sure that the specific host route is advertised in the IGP makes this much more consistent and is considered best practice.
Note: The global command mpls ip is enabled by default on most routers, but it is another command that I usually enter just to make sure it is turned on during configuration.
The final step in bringing up the MPLS process is to enable it on the interfaces of the routers facing each other that you wish for MPLS neighborships to be established. This is done by going into an interface and using the mpls ip command in order to enable MPLS on the interface. Once this is done on both sides of a connection, you will typically see a message indicating that LDP is established:
Example: LDP-5-NBRCHG: LDP Neighbor 10.10.10.20:0 (6) is UP
MPLS LDP Verification
Once I have enabled MPLS on all of my core routers and their interfaces, I use the following commands to make sure that everything looks good.
show mpls ldp neighbor

This output shows us all of the LDP neighbors and gives us quite a bit of good information as well.
- Peer LDP Ident: This is the router-id of the LDP neighbor session.
- Local LDP Ident: This is the router-id of the local router’s LDP session.
- TCP connection: This gives us the TCP port information for the LDP session. The number here that is important is 646, which is the TCP port that LDP hellos are initially sent on. The IP address that precedes this is the router that initiated the LDP session. The other number is an arbitrary TCP port that responds on the other router to the initial LDP hello in order to establish the LDP session. The LDP Hello is initially sent out via an all-router multicast of 224.0.0.2. Targeted LDP sessions using a neighbor statement can also be used in order to limit multicast announcements on a link.
- State: This tells us the state of the link, Oper is what we want to see when the LDP state is operational.
- Msgs sent/rcvd: This is the count of the number of LDP messages, including keepalives, that have been sent to/from this neighbor.
- Downstream: This indicates that the downstream method for distributing labels is being used. The LSR advertises all of its locally assigned (incoming) labels to its LDP peer, barring any ACL restrictions.
- Up-Time: The uptime for this LDP session.
- LDP Discovery sources: These are the sources (Interfaces/IP) that were the source for the establishment of the LDP session.
- Addresses bound to peer LDP Ident: These are interface IP addresses on the LDP peer device. These addresses are a part of the LFIB, and also may be next hop addresses in the local routing table.
show mpls ldp discovery <detail>

This command gives us a nice and concise insight as to the interfaces that LDP peer sessions have been established on, along with the LDP ID of the neighbor on that interface. The detail command gives additional information that is especially useful when troubleshooting timer and other negotiation problems.

As you can see, this tells us much more information on the LDP peer sessions, along with timers, and whether or not a password is required or in use. I’ve found this command especially useful when working on troubleshooting, or if I need to modify timers and determine if both sides have the same timers configured.
show mpls forwarding-table

The MPLS forwarding-table is also known as the LFIB. It is very useful, as it contains a wealth of information when it comes to determining how a labeled packet is handled when it comes into the router. The first column, Local Label, is the label that this router expects to see on a packet that arrives. This is the top label, when we have multiple labels on a stack, and is the only one that this router will be interested in. Since the router we are looking at is a P router, and the way this lab network is built, all labels outbound from it will be at their destination, the Outgoing Label column for all of these labels will be Pop Label. If we had multiple P routers in the LSP, we would see a label in the Outgoing Label that corresponded to the Local Label of the next-hop router for that LSP, and the Local Label would be swapped with that label, and then forwarded out the outgoing interface. The outgoing interface and next hop columns are information that is contained in CEF for the prefix that we are trying to forward the packet to.
There are quite a few other commands that are useful, but for the initial configuration, those are the three that I rely on to make sure that the LFIB looks good before moving on to the next step, which will be to build a BGP VPN network between our PE routers and configure VRF’s on the PE’s to connect to the customer networks. That will be the next in this series of posts.

Great Write up Dustin, will be waiting for the rest of this series to come.
LikeLike
Great work, Dustin! Can’t wait to see more.
LikeLike